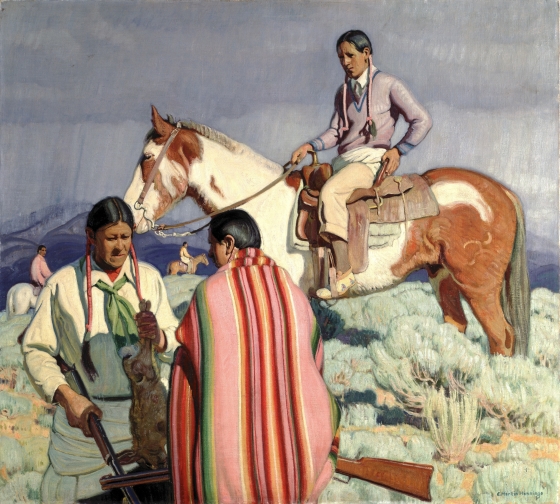
Students will examine and discuss Rabbit Hunt by E. Martin Hennings, paying particular attention to the fact that it is a plein air painting (meaning it was painted outdoors). Students will compare and contrast working inside and working en plein air, and create two pastel drawings showing the distinction.
Students will be able to:
- describe and analyze what they see in Rabbit Hunt;
- define and identify artwork created en plein air;
- create one work of art inside and one en plein air to compare; and
- compare and contrast the two art-making techniques.
Lesson
- Show students Rabbit Hunt and have them critically examine, describe, and critique what they see. Prompt them with the following questions: What is in the picture? What details do you see? What is going on here? How can you tell? What is your reaction to the painting? What makes you say that? What does the landscape look like? Can you tell where this might have been painted? How?
- Tell students this was painted in Taos, New Mexico, in the 1930s. Ask students if any of them have been to New Mexico. If so, does this painting look like the landscape and climate they remember?
- Share information from the About the Art section as appropriate to the lesson.
- Ask students to pay particular attention to the way light and shadow are portrayed in the painting and the effect it gives to the overall feeling of the work. Can students imagine what it might feel like to be in the painting? Explain that E. Martin Hennings worked mostly en plein air, which means “in open air” or “outdoors” in French. This means that he painted outside with direct outdoor light illuminating his subject matter. He did finish details back in his studio, but the painting was done mostly outside.
- Explain that plein air painting is unique in several ways. First, because you are outside you have to deal with the elements. If it is cold, you need to dress accordingly. You must avoid days with wind and rain as they make working very hard. When working outside, all of the senses are engaged more directly by sights, sounds, temperature, and atmospheric light, and there are things that are moving around and alive. It is a good idea to know if any of your students have reactions to insect bites and, if so, have procedures to follow if a bite occurs. Secondly, light changes depending on the weather conditions and time of day, which affects the appearance of what you are painting. You must work quickly enough to finish your work in the same light, or take photos to refer to later.
- Try an experiment with your students. Take a simple object found in the classroom; it could be anything as long as it is something simple, say an apple or a solid-color drawing form. You could even have students fold a quick origami box.
- Instruct students to form groups of 2–3, and set an object where all students in each small group can see it. Place the object on a 9x12–inch piece of white or light-colored mat board or foam board. This will provide a smooth, even surface on which the object’s shadow will be reflected.
- Ask students to observe the values and colors of the object. Have them look closely and count how many shades of color they see on the object. Then look at the shadows cast by and on the object. Are they darker or lighter anywhere? How many shades of shadow can the students count?
- Give students pencils, a 6x9-inch piece of paper, and quality colors to work with, such as Prisma pencils or good soft pastels, anything that has a good pigment that will mark quickly. Have them sketch the object they are looking at. If students want to draw in pencil first, tell them to work quickly and draw lightly enough so that color will cover the pencil marks.
- Students should put emphasis on matching the color, light, and shadow they see. They can blend colors together to get the right shades. Tell them not to worry so much about getting the object’s shape exactly right. Explain to students that they are not really drawing the object; they are drawing the light and color reflected from the object. This should be fairly quick and take no more than 10–15 minutes. Leave these finished works inside.
- Give the students a new sheet of paper and a drawing board or other hard surface and take them outside. Choose a place with few distractions. Bring the same supplies and set up the same object on the board where students can see it and repeat the procedure. First, ask them to look at and analyze the object and its values and colors. How many shades of color and shadow do students see? Do they notice differences in the object’s appearance when it is placed outdoors as opposed to indoors?
- Direct students to quickly and lightly draw the object without concentrating too much on its form. Instead, they should concentrate on the light and color reflected from the object, and to try to reproduce the effect of that light on color, value, and shadow in their image. Instruct them to blend colors to match the values and shades they see on the object. They may be using different colors outside than they did inside. Tell them this is okay; they should make their artwork reflect the light they see.
- When finished, return inside and have students compare the values seen outside with what they observed inside. Have them compare the colors they used inside to those they used outside.
- An extension project would be to do a complete work of art en plein air. This might require taking digital photographs of the subject matter outside to remember how the object was set up and to work with on days of uncooperative weather.
Materials
- A pleasant day with not much wind and no rain
- Two 6x9-inch pieces of heavy drawing paper for each student
- Pencils with erasers for each student
- One set of good quality, blendable soft pastels or blendable color pencils, such as Prismacolor, for every 2–3 students
- One color copy of the image for every 2–3 students, or the ability to project the image onto a screen or wall
- A simple object for every 2–3 students to use as a drawing reference, such as a solid-color modeling shape, piece of fruit, bottle, vase, or any other simple object that is available
- One 9x12-inch piece of mat board, foam board, or cardboard, preferably white or light colored, for each group of students
- One drawing board or other hard surface to put under paper while drawing outside for each student
- About the Art section on Rabbit Hunt
- Optional: Digital camera to record objects in a specific light
- Optional: Access to Internet resources about working en plein air, such as the Plein-Air Painters of America website
Standards
- Visual Arts
- Invent and Discover to Create
- Observe and Learn to Comprehend
- Relate and Connect to Transfer
- Envision and Critique to Reflect
- Language Arts
- Oral Expression and Listening
- Collaboration
- Critical Thinking & Reasoning
- Information Literacy
- Invention
- Self-Direction
Rabbit Hunt
- E. Martin Hennings, American, 1886-1956
- Born: New Jersey
- Work Locations: Taos, NM
E. Martin Hennings was born in New Jersey and spent his childhood in Chicago. Inspired by a visit to the Art Institute of Chicago, he decided to become an artist at the young age of thirteen. He enrolled in classes at the Art Institute and eventually graduated with honors. He also studied painting at the Royal Academy in Munich. In 1917, Hennings visited Taos, New Mexico, on a summer trip sponsored by Chicago Mayor Carter H. Harrison, Jr. While there, Hennings found inspiration in the subject matter of the American West. He made Taos his home in 1921, joined the Taos Society of Artists in 1924, and remained there until his death in 1956.
Hennings did most of his paintings outdoors but would often add finishing touches in his studio. He used many thin layers of paint, which required lengthy drying periods, so he would work on several paintings at a time. Hennings would never sign his name until he was completely satisfied with his work.
Hennings was drawn to both the landscape and the people of the Taos area. The bright sunlight of New Mexico inspired his colorful palette. He commented in his later years, “I have been working in Taos many years and I think that should prove that I like it here; the country, the mountains with their canyons and streams, the sage beneath the clouded skies, the adobe village with its Spanish people and of course the Taos Pueblo with its Indians. Their life—domestic and agricultural—with all the color and romance of their dress and history.”
Hennings knew some of his American Indian subjects very well, and he was even known to change a painting in response to their concerns. He and his wife lived on a reservation for a while, and Hennings shows Indians as he knew them—as people living in the modern world, hunting with rifles and clothed in individual ways, including one fellow in a tennis sweater. “[I]n figure subjects I think I find my greatest inspiration—subjects which you have grown to know from experience and subjects which the imagination brings forth.”
Details

Vertical Patterns
The vertical patterns are most noticeable in the blanket and the braids worn by the men, but Hennings also used the patterns in nature: in the sky, the horse’s tail, and in the sagebrush.

Light
Dramatic light, bright color, and pattern activate this rather static scene. In spite of the dark, stormy sky, the sun throws hard shadows in the foreground. Bright light falls on the three men and the horse in the foreground of the painting, but the title subject, the dead rabbit, is obscured in dark shadows.

The Rabbit
Though the rabbit is hidden in the shadows, Hennings uses several techniques to signal its presence. All the men seem to have their attention focused on the rabbit and their rifles point to their recent kill. The vertical lines play another role here; if you follow the rider’s braids to the horse’s reigns to the other set of braids, your eye is led directly to the rabbit.

The People
Three men have a bold presence in Rabbit Hunt. Though they have quite individualized faces, we don’t know exactly who they are. Notice how each man is clothed in an individual way. The rider, for example is wearing a cross-cultural combination of trousers, a cuffed shirt, a tennis sweater, and moccasins.

The In-between Spaces
The diamond shape under the horse’s neck creates a frame for another horse and rider. At first glance there is only one horse present, but look a little closer and you’ll see there are three in this painting.
The Striped Blanket
Striped blankets were used all the time, but Hennings would have selected the colors, pattern, and position of the blanket to suit his vision for the scene.

Colors in Unexpected Places
Bright colors are found throughout this painting in the highlights and shadows. Notice the bright red-orange near the horse’s hind leg, the yellow contours on the shadowed white clothing, and the light blue edges of the sagebrush in the center.

Triumph in Love
Students will examine the artistic qualities of the paintings, identify different entities or elements which triumph in contemporary life, and develop and illustrate a written piece about an element or entity that triumphs in their lives.

Composite Picture of a Leader
Students will examine the artistic characteristics of Summer; explain how Arcimboldo’s composite paintings convey multiple layers of meaning; and create a composite drawing or collage of a famous leader from history sharing the accomplishments, issues, and challenges associated with his or her tenure as a leader.

Weaving Words
Students will look at the Bird and Cornstalk Rug in pairs and discuss Yellowhair’s inspiration from both natural and man-made forms. They will then engage in a creative writing exercise that develops their awareness of symbolism in their daily lives.

Living for the City
Students will explore how painter Claude Monet and poet E.E. Cummings used different artistic mediums to highlight the contrasts found in a city. They will then explore various literary devices and compose a poem in the style of Cummings.

Beyond First Impressions
Students will examine the visual tools used in the painting Road to Santa Fe and how those tools help the painter tell a particular story. They will then use the painting to explore storytelling and use brainstorming strategies to enrich the content and voice of stories they will write. Multiple drafts and peer-editing will help teach students how working and reworking a piece, much like painters do when planning a painting, will strengthen their finished product.

Clothing Conversations
In this lesson, students will explore the symbols, patterns, and colors that are important to the Osage people. Students will compose a written reflection on the messages that their clothing communicates about them, just as the Ribbon Appliqué Wearing Blanket communicated messages about the person who wore it.
Funding for object education resources provided by a grant from the Morgridge Family Foundation. Additional funding provided by the William Randolph Hearst Endowment for Education Programs, and Xcel Energy Foundation. We thank our colleagues at the University of Denver Morgridge College of Education.
The images on this page are intended for classroom use only and may not be reproduced for other reasons without the permission of the Denver Art Museum. This object may not currently be on display at the museum.